ServiceNow Developer instances are great to help you learn more about ServiceNow, test functionality, or just try to break it. These SaaS instances power up very quickly, and you have the ability to wipe them and start over anytime you’d like. I want to show you how easy it is to obtain a developer instance of ServiceNow and start kicking the tires. And since most of my articles will focus on automation, we’ll include the (basic) configuration for API integration to SerivceNow.
For anyone in the ServiceNow community, this article will be a no-brainer. For many of my blog followers, this will be new territory and is essential for following along in some of my upcoming articles.
ServiceNow release versions are named after cities, in alphabetical order. So as you can see in Figure 1, you can choose from Madrid, New York, and Orlando. Orlando is the latest release. Choose the latest release available to you and select Request. Learn Servicenow Developer Training
Figure 1 – Requesting a ServiceNow Instance
Normally when you choose the latest release and select Request, your instance will be available in a matter of seconds!!! You’ll receive a notification as shown in Figure 2.
Figure 2 – Instance Ready Notification
Take note of your instance URL and admin password, and then select Open Instance to launch the ServiceNow instance. (Also note that the instance is reclaimed after 10 days of inactivity).
On the first login, you’ll be prompted to change your password. Take care of that, and then you will see the ServiceNow home page, as shown in Figure 3. *Note this is the administrator view.
Figure 3 – ServiceNow Home Page, Madrid Release (Administrator View)
Congrats! You have a developer instance of ServiceNow!
Create a Service Account for API Access
Now that we have an instance, we need to create a new user to be used as the service account for API access. For this example, we will enable basic access and authentication. For a production deployment, work with your ServiceNow team for a more secure method (such as OAuth). For more info Servicenow Training
In the left-hand navigation, type ‘users’ and then navigate to System Security->Users and Groups->Users, as shown in Figure 4.
Figure 4 – The Users table
As you can see in Figure 4, the developer instance includes sample data. Click New to create a new user. Populate the user information, similar to Figure 5, enter a password and select Submit.
Figure 5 – Create a Service Account
Next, select that record to open it back to the detail view, select the Roles tab and click Edit as shown in Figure 5.
Figure 6 – Edit User Roles
From the Edit Members page, grant the following roles: itil, and snc_platform_rest_api_access as shown in Figure 7. This will give your service account enough rights to Create/modify incidents, requests, and perform other ITIL functions. Be sure to restrict service account access as much as possible for your production scenario.
Figure 7 – Adding Roles to the Service Account
Click to Save changes.
Test API Access using PowerShell
Read Test
Now it’s time to test! You could use Postman or any API testing tool, but we’ll use PowerShell here. Use this sample code:
When run, this code will prompt for credentials (enter the credentials you created with the service account), and then query your ServiceNow Developer instance and return one result (sysparm_limit=1).
Write Test
Now let’s do a quick write test to ensure it’s working as desired. This example will create a (very) basic incident:
12345678910
$cred= Get-Credential$body= @"{"short_description":"Loud Fan on notebook"}"@$results= Invoke-WebRequest-Uri"https://dev80150.service-now.com/api/now/table/incident"-MethodPost-Credential$cred-body$body-Headers@{'Content-Type'= 'application/json; charset=utf-8'}($results.content | ConvertFrom-Json).Result
You can also see the created incident number in the returned result.
From ServiceNow, type Incident in the top-left search bar, as shown in Figure 8.
Next select Open under Incident.
Click on the gear icon to select/re-order columns.
Your newly-created incident should appear at the top of the list (if not, click on Number to re-sort.
Figure 8 – Finding your newly-created incident
This is a basic example of creating an incident that is only here for you to verify connectivity. I have found that many applications advertise they integrate with ServiceNow, and while true, the integration they support could only be used in a lab environment.
Most business processes will require more information than the minimum required fields for ServiceNow. The challenge is that every company/business process requires different fields and data for things such as an incident.
My recommendation to anyone who wants to integrate with ServiceNow is to also have an advanced option, where I (as an automation admin) can provide a JSON of the fields that I want to pass from the 3rd party application to ServiceNow. This is not a one size fits all world.
Learn about next-gen ETL pipelines: stream processing and automated data management. Get beyond the 90s, when there was only one way to build an ETL process.
While the traditional ETL process is the predominant data processing flow in many organizations, there are newer, more exciting data processing methods. One is stream processing – agile and able to deal with real time data on the fly. Another is automated data management – bypassing traditional ETL and using an “ELT” paradigm – Extract, Load, then Transform.
In this page, we’ll explain how to build an ETL process the heavy, traditional way – from data extraction to loading precise structured data to a data warehouse.
But we’ll also take you beyond the old school, showing how to build ETL pipelines based on stream processing using Kafka, and how to fully automate ETL using Panoply’s data management platform.
What is the ETL Process?
Extract, Transform, Load (ETL), an automated process which takes raw data, extracts the information required for analysis, transforms it into a format that can serve business needs, and loads it to a data warehouse. ETL typically summarizes data to reduce its size and improve performance for specific types of analysis.
When you build an ETL infrastructure, you must integrate data sources, and carefully plan and test to ensure you transform source data correctly. Below we explain three ways to build an ETL infrastructure, and one more way to build a data pipeline without using ETL at all. Learn more from ETL Testing Training
1. Building an ETL Pipeline with Batch Processing
Follow the process below to build a traditional ETL process, in which you transfer and process data in batches from source databases to data warehouse. It’s challenging to build an enterprise ETL pipeline from scratch – you will typically rely on ETL tools such as Stitch or Blendo, which simplify and automate much of the process.
Building ETL with batch processing, following ETL best practices, involves:
Reference data – create a set of data that defines the set of permissible values your data may contain. For example, in a country data field, you can define the list of country codes allowed.
Extract from data sources – the basis for the success of subsequent ETL steps is to extract data correctly. Most ETL systems combine data from multiple source systems, each with its own data organization and format – including relational databases, non-relational databases, XML, JSON, CSV files, etc. Successful extraction converts data into a single format for standardized processing.
Data validation – an automated process confirms whether data pulled from sources has the expected values – for example, in a database of financial transactions from the past year, a date field should contain valid dates within the past 12 months. The validation engine rejects data if it fails the validation rules. You analyze rejected records, on an ongoing basis, to identify what went wrong, correct the source data, or modify extraction to resolve the problem in the next batches.
Transform data – removing extraneous or erroneous data (cleaning), applying business rules, checking data integrity (ensuring that the data was not corrupted in source, or corrupted by ETL, and that no data was dropped in previous stages), and creating aggregates as necessary. For example, if you must analyze revenue, you can summarize the dollar amount of invoices into a daily or monthly total. You will need to program and test a series of rules or functions that can achieve the required transformations, and run them on the extracted data.
Stage – you will not typically load transformed data directly into the target data warehouse. Data should first enter a staging database, making it easier to roll back if something goes wrong. At this point, you can also generate audit reports for regulatory compliance, or diagnose and repair data problems.
Publish to data warehouse – loading the data to the target tables. Some data warehouses overwrite existing information every time the ETL pipeline loads a new batch – this might happen daily, weekly or monthly. In other cases, ETL can add new data without overwriting, with a timestamp indicating it is new. You must do this carefully to prevent the data warehouse from “exploding” due to disk space and performance limitations.
2. Building an ETL Pipeline with Stream Processing
Modern data processes often include real time data – for example, web analytics data from a large ecommerce website. In these use cases, you cannot extract and transform data in large batches: the need arises to perform ETL on data streams. This means that as client applications write data to the data source, data should be treated, transformed and saved immediately to the target data store.
Many stream processing tools are available today – including Apache Samza, Apache Storm, and Apache Kafka. The diagram below illustrates an ETL pipeline based on Kafka, described by Confluent:
Building streaming ETL based on Kafka involves:
Extracting data into Kafka – the Confluent JDBC connector pulls each row of the source table and writes it as a key/value pair into a Kafka topic (you can implement a database connection yourself without Confluent’s commercial product). Applications interested in the state of this table read from this topic. As client applications add rows to the source table, Kafka automatically writes them as new messages to the Kafka topic, enabling a real time data stream.
Pulling data from Kafka topics – the ETL application extracts messages from the Kafka topic as Avro records, creates an Avro schema file and deserializes them, and creates KStream objects from the messages.
Transform data in KStream object – using the Kafka Streams API, the stream processor receives one record at a time, processes it, and can produce one or more output records for downstream processors. These can transform messages one at a time, filter them based on conditions, or perform data operations on multiple messages, for example aggregation.
Load data to other systems – the ETL application still holds the enriched data, and now needs to stream it into target systems, such as a data warehouse or data lake. In Confluent’s example, they propose using their S3 Sink Connector to stream the data to Amazon S3. You can implement integration with other systems, for example, stream data to a Redshift data warehouse using Amazon Kinesis.
What is ELT?
In the ELT process, after you extracted data from all data sources, you immediately start moving it into a centralized data repository. Today’s cloud-based data warehouse and data lake infrastructure supports large storage and scalable compute. So it’s no longer necessary to prevent the data warehouse from “exploding” by keeping data small and summarized. Many organizations today maintain massive data pools in the cloud at low cost, leveraging ELT tools to process the data.
3. Building a Pipeline without ETL Using an Automated Cloud-Based Data Warehouse
New cloud-based data warehouse technology makes it possible to achieve the original goal of ETL without building an ETL system at all.
For example, Panoply’s cloud-based automated data warehouse has end-to-end data management built in. It uses a self-optimizing architecture with machine learning and natural language processing (NLP), which automatically extracts and transforms data to match analytics requirements. Panoply comes pre-integrated with dozens of data sources, including analytics systems, BI tools, databases, social and advertising platforms.
Building a data pipeline without ETL in Panoply involves:
Select data sources and import data – select your data sources from a list, enter credentials and define destination tables, click Collect and Panoply automatically pulls the data for you. Panoply automatically takes care of schemas, data preparation, data cleaning, and more.
Run transformation queries – select a table and run a SQL query against the raw data. You can save the query as a transformation, or export the resulting table into your own system. Panoply supports both simple views and materialized transformation views. You can run several transformations, until you achieve a data format that enables analysis. Panoply’s Query Log allows you to easily roll back to previous processing steps. You shouldn’t be concerned about “ruining” the data – Panoply lets you perform any transformation, but keeps your raw data intact.
Data analysis with BI tools – you can now connect any BI tool such as Tableau or Looker to Panoply and explore the transformed data.
The above process is agile and flexible, allowing you to quickly load data, transform it into a useful form, and use it to perform business analysis.
Out with the Old, in with the New
We have shown three ways to build an ETL process, which you can think of as three stages in the evolution of ETL:
Traditional ETL batch processing – meticulously preparing data and transforming it using a rigid, structured process.
ETL with stream processing – using a modern stream processing framework like Kafka, you can pull data in real time from source, manipulate it on the fly using Kafka’s Stream API, and load it to a target system such as Amazon Redshift.
Automated data pipeline without ETL – we showed how to use our automated data warehouse, Panoply, to pull data from multiple sources, automatically prep it without requiring a full ETL process, and immediately begin analyzing it using BI tools.
Traditional ETL works. But it is complex to build, rigid, and unsuitable for many modern requirements. If your organization and skill set are strongly rooted in the “old ETL”, we strongly recommend you learn more about new technologies to achieve the same objectives more quickly and efficiently. As an ETL or data engineer, you can quickly make the shift in mindset. As an early adopter of stream processing, or even fully automated data warehousing, you have the chance to develop expertise in building next-generation data pipeline.
As they face ever-changing business requirements, our customers need to adapt quickly and effectively. When we designed Workday’s original architecture, we considered agility a fundamental requirement. We had to ensure the architecture was flexible enough to accommodate technology changes, the growth of our customer base, and regulatory changes, all without disrupting our users.
We started with a small number of services. The abstraction layers we built into the original design gave us the freedom to refactor individual services and adopt new technologies. These same abstractions helped us transition to the many loosely-coupled distributed services we have today.
At one point in Workday’s history, there were just four services: User Interface (UI), Integration, OMS, and Persistence. Although the Workday architecture today is much more complex, we still use the original diagram below to provide a high-level overview of our services. For more info Wokday online Training
At the heart of the architecture are the Object Management Services (OMS), a cluster of services that act as an in-memory database and host the business logic for all Workday applications. The OMS cluster is implemented in Java and runs as a servlet within Apache Tomcat. The OMS also provides the runtime for XpressO — Workday’s application programming language in which most of our business logic is implemented. Reporting and analytics capabilities in Workday are provided by the Analytics service which works closely with the OMS, giving it direct access to Workday’s business objects.
The Persistence Services include a SQL database for business objects and a NoSQL database for documents. The OMS loads all business objects into memory as it starts up. Once the OMS is up and running, it doesn’t rely on the SQL database for read operations. The OMS does, of course, update the database as business objects are modified. Using just a few tables, the OMS treats the SQL database as a key-value store rather than a relational database. Although the SQL database plays a limited role at runtime, it performs an essential role in the backup and recovery of data.
The UI Services support a wide variety of mobile and browser-based clients. Workday’s UI is rendered using HTML and a library of JavaScript widgets. The UI Services are implemented in Java and Spring.
The Integration Services provide a way to synchronize the data stored within Workday with the many different systems used by our customers. These services run integrations developed by our partners and customers in a secure, isolated, and supervised environment. Many pre-built connectors are provided alongside a variety of data transformation technologies and transports for building custom integrations. The most popular technologies for custom integrations are XSLT for data transformation and SFTP for data delivery. Learn more from Workday Training Online
The Deployment tools support new customers as they migrate from their legacy systems into Workday. These tools are also used when existing customers adopt additional Workday products.
Workday’s Operations teams monitor the health and performance of these services using a variety of tools. Realtime health information is collected by Prometheus and Sensu and displayed on Wavefront dashboards as time series graphs. Event logs are collected using a Kafka message bus and stored on the Hadoop Distributed File System, commonly referred to as HDFS. Long-term performance trends can be analyzed using the data in HDFS.
As we’ve grown, Workday has scaled out its services to support larger customers, and to add new features. The original few services have evolved into multiple discrete services, each one focused on a specific task. You can get a deeper understanding of Workday’s architecture by viewing a diagram that includes these additional services. Click play on the video above to see the high-level architecture diagram gain detail as it transforms into a diagram that resembles the map of a city. (The videos in this post contain no audio.)
This more detailed architecture diagram shows multiple services grouped together into districts:
These services are connected by a variety of different pathways. A depiction of these connections resembles a city map rather than a traditional software architecture diagram. As with any other city, there are districts with distinct characteristics. We can trace the roots of each district back to the services in our original high-level architecture diagram.
There are a number of landmark services that long-time inhabitants of Workday are familiar with. Staying with the city metaphor, users approaching through Workday Way arrive at the UI services before having their requests handled by the Transaction Services. Programmatic access to the Transaction Service is provided by the API Gateway. Get more skills from Workday Integration Training
The familiar Business Data Store is clearly visible, alongside a relatively new landmark: the Big Data Store where customers can upload large volumes of data for analysis. The Big Data Store is based on HDFS. Workday’s Operations team monitors the health and performance of the city using the monitoring Console based on Wavefront.
User Interface Services
Zooming in on the User Interface district allows us to see the many services that support Workday’s UI.
The original UI service that handles all user generated requests is still in place. Alongside it, the Presentation Services provide a way for customers and partners to extend Workday’s UI. Workday Learning was our first service to make extensive use of video content. These large media files are hosted on a content delivery network that provides efficient access for our users around the globe. Worksheets and Workday Prism Analytics also introduced new ways of interacting with the Workday UI. Clients using these features interact with those services directly. These UI services collaborate through the Shared Session service which is based on Redis. This provides a seamless experience as users move between services.
Metadata-Driven Development
This architecture also illustrates the value of using metadata-driven development to build enterprise applications.
Application developers design and implement Workday’s applications using XpressO, which runs in the Transaction Service. The Transaction Service responds to requests by providing both data and metadata. The UI Services use the metadata to select the appropriate layout for the client device. JavaScript-based widgets are used to display certain types of data and provide a rich user experience. This separation of concerns isolates XpressO developers from UI considerations. It also means that our JavaScript and UI service developers can focus on building the front-end components. This approach has enabled Workday to radically change its UI over the years while delivering a consistent user experience across all our applications without having to rewrite application logic.
The Object Management Services
The Object Management Services started life as a single service which we now refer to as the Transaction Service. Over the years the OMS has expanded to become a collection of services that manage a customer’s data. A brief history lesson outlining why we introduced each service will help you to understand their purpose.
Originally, there was just the Transaction Service and a SQL database in which both business data and documents were stored. As the volume of documents increased, we introduced a dedicated Document Store based on NoSQL.
Larger customers brought many more users and the load on the Transaction Service increased. We introduced Reporting Services to handle read-only transactions as a way of spreading the load. These services also act as in-memory databases and load all data on startup. We introduced a Cache to support efficient access to the data for both the Transaction Service and Reporting Services. Further efficiencies were achieved by moving indexing and search functionality out of the Transaction Service and into the Cache. The Reporting Services were then enhanced to support additional tasks such as payroll calculations and tasks run on the job framework.
Search is an important aspect of user interaction with Workday. The global search box is the most prominent search feature and provides access to indexes across all customer data. Prompts also provide search capabilities to support data entry. Some prompts provide quick access across hundreds of thousands of values. Use cases such as recruiting present new challenges as a search may match a large number of candidates. In this scenario, sorting the results by relevance is just as important as finding the results. Learn more from Workday Studio Training
A new search service based on Elasticsearch was introduced to scale out the service and address these new use cases. This new service replaces the Apache Lucene based search engine that was co-located with the Cache. A machine learning algorithm that we call the Query Intent Analyzer builds models based on an individual customer’s data to improve both the matching and ordering of results by relevance.
Scaling out the Object Management Services is an ongoing task as we take on more and larger customers. For example, more of the Transaction Service load is being distributed across other services. Update tasks are now supported by the Reporting Services, with the Transaction Service coordinating activity. We are currently building out a fabric based on Apache Ignite which will sit alongside the Cache. During 2018 we will move the index functionality from the Cache onto the Fabric. Eventually, the Cache will be replaced by equivalent functionality running on the Fabric.
Watch the video above to view the lifecycle of an integration. The schedule for an integration is managed by the Transaction Service. An integration may be launched based on a schedule, manually by a user, or as a side effect of an action performed by a user. The Integration Supervisor, which is implemented in Scala and Akka, manages the grid of compute resources used to run integrations. It identifies a free resource and deploys the integration code to it. The integration extracts data through the API Gateway, either by invoking a report as a service or using our SOAP or REST APIs. A typical integration will transform the data to a file in Comma Separated Values (CSV) or Extensible Markup Language (XML) and deliver it using Secure File Transfer Protocol (SFTP). The Integration Supervisor will store a copy of the file and audit files in the Documents Store before freeing up the compute resources for the next integration.
Persistence
There are three main persistence solutions used within Workday. Each solution provides features specific to the kind of data it stores and the way that data is processed.
Business data is stored in a SQL database which supports tenant management operations such as backup, disaster recovery, copying of tenants, and point-in-time recovery of data.
Documents are stored in a NoSQL database, which provides a distributed document store and disaster recovery. The Document Storage Gateway provides functionality to connect the NoSQL database with other Workday systems. It provides tenant-level encryption and links the documents to the business data so that documents are handled appropriately during tenant management operations.
Big data files uploaded by our customers are stored in HDFS. The assumption here is that the data loaded by customers will be so large that it needs to be processed where it’s stored, as opposed to being moved to where the compute resources are. HDFS and Spark provide the capabilities necessary to process the data in this way.
A number of other persistence solutions are used for specific purposes across the Workday architecture. The diagram above highlights some of them:
Performance Statistics are stored in HDFS. Note that this is a different installation of HDFS to our Big Data Store which is also based on HDFS.
Diagnostic log files are stored in Elasticsearch.
The Search service uses Elasticsearch to support global search and searching within prompts.
The Integration Supervisor manages the queue of integrations in a MySQL database
Worksheets stores some user-created spreadsheets in a MySQL database.
The UI Services access the Shared Sessions data in a Redis in-memory cache. The OMS services also use a Redis cache to manage user sessions and to coordinate some activity at a tenant level.
The Media Content for products such as Workday Learning is stored in Amazon S3.
All of these persistence solutions also conform to Workday’s policies and procedures relating to the backup, recovery, and encryption of tenant data at rest.
Analytics
Workday Prism Analytics provides Workday’s analytics capabilities and manages users’ access to the Big Data
Click play to view a typical Analytics scenario. Users load data into the Big Data Store using the retrieval service. This data is enhanced with data from the transaction service. A regular flow of data from the Transaction Server keeps the Big Data Store up to date.
To get in-depth knowledge, enroll for a live free demo on Workday Training
MuleSoft is adding features to its Anypoint Platform to allow both technical and non-technical users better visualize and understand how APIs (and related integrations to services and microservices) impact performance and effectiveness of connected apps, data and devices.
In specific, the latest Mulesoft update adds machine learning, real-time insights, visualizations and granular security features. All these features enhance Mulesoft’s “application network” approach rolled out early this year.
Anypoint Platform’s vision for an “application network’ comes as the skyrocketing use of APIs in enterprises can lead to a growing sprawl of API-powered point-to-point connections. The Mulesoft ‘application network’ approach in the company’s Anypoint Platform aims to bring deeper visibility and more granular control to API use, Mulesoft’s head of product marketing David Chao told IDN.
“To drive the modern digital customer experiences requires more than the implementation of any single technology. Rather, it comes from bringing multiple technologies together to create truly connected — but also consistent — customer experiences,” For more details Mule Certification
“This release really takes our vision for the ‘application network’ one step further by unlocking the insights within that application network through what we call the application network graph,” Chao said.
Chao explained the ‘application network graph’ this way:
“The same way that we can think of a social network graph and the interactions and connections between different friends and different colleagues, we can apply that concept to the ‘application network graph’ so we can better understand how applications are connected –and how all that supports different applications and Integrations,” Chao told IDN.
He went on to explain how the ‘application network graph’ delivers benefits to companies pursuing various digital transformation projects.
Organizations are being required to connect an ever-increasing number of applications, data and devices to deliver digital transformation and create innovative new customer apps and experiences, Chao noted. By building an application network, companies can gain “instant fine-grained visibility into information across the application network through its graph [and] gain deeper insights that are otherwise incredibly difficult to obtain,” he added.
To deliver this visibility and control, Mulesoft designed the ‘application network graph’ to display and contextualizes myriad metadata. Such data includes a rich set of the inner workings of APIs and connections, as well as components and operational characteristics, Chao added.
As a result, development teams, IT and business users can all access deep information in the context they best understand about the workings of their APIs and integration-driven applications and systems.
“With the application network graph, I think we’re able to have more visibility and transparency to better helps us with problem resolution. That helps us with dependency analysis so that we can increase operational efficiency and effectiveness, as well as decrease the mean time for resolution,” Chao told IDN.
In this context, Chao explained how Mulesoft’s Anypoint Platform application network and application network graph provides a number of benefits across developer, IT and business stakeholders. Get more from Mule 4 Training
First, by making different applications pluggable and reusable, it allows users to “quickly iterate and then build out various customer experiences in a way that is reflective of changing customer preferences,” Chao said.
Beyond that, Chao added, “the application network graph specifically allows users to really understand how data is flowing between different nodes or on the application network.” In this way, the Anypoint Visualizer supports architects as well as folks that may be owning the management and uptime of these integration applications. It also helps business stakeholders visualize and ensure the customer experiences they had in mind are performant, robust and secure, he added.
It’s important to note here that under the covers, Mulesoft’s application network graph is embedded in three major components of the Anypoint platform – Anypoint Design Center, Anypoint Visualizer and Anypoint Monitoring.
“Having that capability through Anypoint Visualizer and having it incorporated with Anypoint Monitoring has really helped our customers better realize and move more quickly towards realizing that vision of the application network.”
Adding to the power of the application network, MuleSoft also added an array of machine learning and smart policies enable users to set and trigger autonomous actions or allow users to overrule presets and set new controls based on insights.
Among the notable Anypoint Platform updates for its ‘application network’ and new ‘application network graph’ are Mulesoft Course
Automatic holistic view of APIs and integrations:
Anypoint Visualizer automatically builds a holistic view of an organization’s APIs and integrations. To do so, it uses information the application network graph.
Further, Visualizer can use data Anypoint Monitoring. This provides the ability to troubleshoot issues quickly. “By segmenting the view by average response time, errors and throughput, users can understand where issues may emerge before they happen and pinpoint the root cause when they do arise,” Chao said.
Machine learning for data mapping to accelerate development:
Anypoint Design Center’s flow designer applies machine learning to the mappings from the application network graph. Using knowledge from the application network graph, automatically provides recommendations for data mapping and suggests ways to supply required data transformations. This information is also presented to users, allowing them to accept or tailor the recommendations to fit their organization’s specific business processes.
Expanded suite of API management policies:
MuleSoft is also introducing new API policies into the application network graph that provide additional layers of security and control. These policies can be easily applied with clicks, not code, helping users increase their security posture to prevent breaches, such as DoS attacks.
As an application network expands, so does the number of users, traffic and access points. This can also increase the vulnerability of the network, Chao noted. “That is why it is important to apply security at every layer, embedding security into API designs, tokenizing data at rest and in transit, and applying policies on individual APIs and at the edge.”
Bringing Order to API Chaos – Without Constraining Innovation
In addition to these features, Anypoint Platform’s application networks also help with management and runtime of new-gen architectures, including microservices, Chao said.
“With Anypoint Runtime Fabric, released in May, we help companies think about microservices in the sense that you’re able to use Runtime Fabric to deploy services across different environments – AWS, Azure, VMs [virtual machines] and even bare metal. Underneath Runtime Fabric is a set of containerization technology, so [it] is built on top of Docker and orchestrated by kubernetes.”
Bringing a mountain dispersed set of APIs and integration together in one platform may sound appealing to companies coping with API sprawl, it may also sound like an intimidating task – if not an impossible one. On that score, Mulesoft is helping companies on-ramp their integration infrastructures through an application network approach, Chao said,
For a growing number of vertical industries, Mulesoft engineers are working on accelerators and patterns to help companies get quickly started. “We’re coming with codified IP on what those architectures might look like, what API designs and implementations might look like that really reflects how we think about building an application network,” Chao said.
Analyst, Customer Reaction to Mulesoft’s Latest Anypoint Platform Updates
Mulesoft’s approach to blend its ‘application network’ platform technology, alongside insights and reference implementation is attracting attention.
Among analysts, Maureen Fleming, program vice president, Integration and Process Automation research, IDC, noted the importance of deeper visibility into data, as well as API and integration connectivity.
“Very few companies are getting all the value from their data as they should be, as it is locked up in various applications and systems that aren’t designed to talk to each other. Companies who are truly digitally capable will be able to connect these disparate data sources, pull critical business-level data from these connections, and make informed business decisions in a way that delivers competitive advantage.,” she said.
Among enterprise users of APIs execs at travel app, Saber Solutions, are already working on their own ‘application network’ with Mulesoft to help increase revenues to airlines as well as accelerate the delivery of new consumer apps that can offer end-to-end personalization. Anypoint’s application network graph will let Saber “gain new levels of visibility across our application network, allowing us to further scale, speed development [and] increase operational efficiency,” said Saber CTO Vish Saoji, in a statement.
Earlier this year, MuleSoft debuted the Anypoint Platform’s vision for an “application network,” noting that even as APIs were skyrocketing in popularly, they often would lead to a growing sprawl of API-powered point-to-point connections. An ‘application network’ approach, Mulesoft suggested, could bring APIs better ease-of-use, deeper visibility and more granular control.
Combined, these benefits would let designers, developers and IT more precisely throttle API connections to meet the needs of business, operations and security staff.
To get in-depth knowledge, enroll for a live free demo on Mule Training
Application we are going to build is very simple. We are going to use MongoDB as our database and will create .NET Web APIs for data operation on MongoDB and there will be a test client to use our Web APIs.
Database Setup Creating database is a piece of cake in MongoDB. You can refer my previous article for more details. We just need to write the following command to create database named studentsDB and collection named students:
Above command will create collection and insert a record on it.
For the sake of simplicity I am only creating one collection ‘students’ and will perform all our operations on this collection.
Creating Web API
Open Visual Studio to create a new project, I am using Visual Studio 2013 community edition. You can use Visual Studio 2013 or above version for the same.
Steps:
Select Web, then ASP.NET MVC 4 Web Application.
Give Project Name: Students.API.
Select Web API and click OK
That’s the power of Visual studio within few clicks we are ready with a dummy Web API project. By default controllers contain Home and Value Controller you can choose to delete them because we will create our own student controller to manage client calls. But before that there are other things we need to take care of. It’s just the beginning of fun ride of our journey. For more info MongoDB Training
Creating Data Model
Data Model is the project in our solution which contains Models of our application.
Steps:
Add a new class library project to your solution and name it Students.DataModel.
Delete the default Class1.cs because we won’t need it.
Create a folder named Models and add a class named Student.cs to it. This class is going to be our Model Class for Student entity of students collection.
Similarly create a folder named StudentsRepository and add StudentsRepository.cs class to it.
In the same manner create one more folder named UnitOfWork and add StudentsUnitOfWork.cs to it.
Before adding any code to Student class we need to add reference of official MongoDB drivers to our Data Model project so that we can communicate to MongoDB.
Right click on the Data Model project, select Manage NuGet Packages and search for MongoDB.
code of StudentRepository class with the following code:
using MongoDB.Driver;
using MongoDB.Driver.Builders;
using System;
using System.Collections.Generic;
using System.Linq;
using System.Linq.Expressions;
namespace Students.DataModel.StudentRepository
{
    publicclassStudentRepository < T > where T: class
    {
        privateMongoDatabase _database;
        privatestring _tableName;
        privateMongoCollection < T > _collection;
        // constructor to initialise database and table/collection
        public StudentRepository(MongoDatabase db, string tblName)
        {
            _database = db;
            _tableName = tblName;
            _collection = _database.GetCollection < T > (tblName);
        }
        ///<summary>
            /// Generic Get method to get record on the basis of id
        ///</summary>
        ///<param name="i"></param>
        ///<returns></returns>
        ublic T Get(int i)
        {
            return _collection.FindOneById(i);

            ///<summary>
            /// Get all records
            ///</summary>
            ///<returns></returns>
        ublicIQueryable < T > GetAll()
        {
            MongoCursor < T > cursor = _collection.FindAll();
                return cursor.AsQueryable < T > ();
        }
        ///<summary>
        /// Generic add method to insert enities to collection
        ///</summary>
        ///<param name="entity"></param>
        publicvoid Add(T entity)
        {
            _collection.Insert(entity);
        }
        ///<summary>
        /// Generic delete method to delete record on the basis of id
        ///</summary>
        ///<param name="queryExpression"></param>
        ///<param name="id"></param>
        publicvoid Delete(Expression < Func < T, int >> queryExpression, int id)
        {
            var query = Query < T > .EQ(queryExpression, id);
            _collection.Remove(query);
        }
        ///<summary>
        /// Generic update method to delete record on the basis of id
        ///</summary>
        ///<param name="queryExpression"></param>
        ///<param name="id"></param>
        ///<param name="entity"></param>
        publicvoid Update(Expression < Func < T, int >> queryExpression, int id, T entity)
        {
            var query = Query < T > .EQ(queryExpression, id);
            _collection.Update(query, Update < T > .Replace(entity));
        }
    }
Above class is self-explanatory, it is a generic class to handle operation on various collection and different entities. We have created five generic methods to perform CRUD operation on any collection. First method, will grab one document from the collection initialized on constructor on the basis of integer id provided as the parameter. Second method, will grab all records from the collection as queryable. See how the FindAll() method returns MongoCursor which then will return entities as queryable. Third method, as the name suggests will add one entity received as parameter to specified collection. Fourth method, will delete record on the basis of id provided. Firstly, it will query the collection to search for the document with the id provided and then delete the same. Fifth method, will query the collection on the basis of id and then update (replace the document found with the new document provided). Id of the old document should match the new document provided. Learn more skills from MongoDB Certification
Now it’s time to replace StudentsUnitOfWork Class with the following code:
using MongoDB.Driver;
using Students.DataModel.Models;
using Students.DataModel.StudentRepository;
using System.Configuration;
namespace Students.DataModel.UnitOfWork
{
    public class StudentsUnitOfWork
    {
        private MongoDatabase _database;
        protected StudentRepository < Student > _students;
        public StudentsUnitOfWork()
        {
            var connectionString = ConfigurationManager.AppSettings["MongoDBConectionString"];
            var client = newMongoClient(connectionString);
            var server = client.GetServer();
            var databaseName = ConfigurationManager.AppSettings["MongoDBDatabaseName"];
            _database = server.GetDatabase(databaseName);
        }
        public StudentRepository < Student > Students
        {
            get
            {
                if (_students == null) _students = newStudentRepository < Student > (_database, "students");
                return _students;
            }
        }
    }
}
Here we created StudentsUnitOfWork class which establishes connection with the MongoDB Server and the database we want to perform CRUD operations and it will simply return the StudentRepository as its property. Add new key value pair in the appSettings section to web config of Students.API project.
Now we need services to handle StudentsUnitOfWork and call appropriate method to communicate with the database and return the result to our controller.
Steps
Add new class library project to your solution named Students.Services.
Add an interface named IStudentService and a class StudentService that will inherit the interface added to the Students.Services.
It’s time to add code to your StudentService class and as it will inherit the above interface we will have to provide the body for all the methods of interface. Let’s replace service class code with the following code:
using Students.DataModel.Models;
using Students.DataModel.UnitOfWork;
using System.Linq;
namespace Students.Services
{
    public class StudentService: IStudentService
    {
        private readonly StudentsUnitOfWork _sUnitOfwork;
        public StudentService()
        {
            _sUnitOfwork = newStudentsUnitOfWork();
        }
        public Student Get(int i)
        {
            return _sUnitOfwork.Students.Get(i);
        }
        public IQueryable < Student > GetAll()
        {
            return _sUnitOfwork.Students.GetAll();
        }
        public void Delete(int id)
        {
            _sUnitOfwork.Students.Delete(s => s.StudentID, id);
        }
        public void Insert(Student student)
        {
            _sUnitOfwork.Students.Add(student);
        }
        public void Update(Student student)
        {
            _sUnitOfwork.Students.Update(s => s.StudentID, student.StudentID, student);
        }
    }
}
We have created a private object of StudentsUnitOfWork and initialized it in the constructor. In our first method Get, we are calling generic Get method of StudentsUnitOfWork property’s students (StudentsRepository) which will return Student object. Similarly, second method will return IQueryable objects of student class. Insert method is pretty simple and we are sending a new student object to be added to the StudentsUnitOfWork. Delete and Update method are similar in the sense that in both method lamba expression is used which will delete and update records respectively.
Updating Web API
Let me remind you that our Web API project comes with default controllers Home and Value Controller we need to create our own controller named StudentController for creating RESTful Web APIs. Here are the steps for the same:
Right click on the Controllers folder in the Students.API project and new controller.
Replace the default code of controller with the following code:
using System.Linq;
using System.Web.Http;
using Students.DataModel.Models;
using Students.Services;
using System.Net.Http;
using System.Net;
namespace Students.API.Controllers
{
    public class StudentsController: ApiController
    {
        privatereadonlyIStudentService _studentService;
        public StudentsController()
            {
                _studentService = newStudentService();
            }
            // GET api/student/id
        public HttpResponseMessage Get(int id)
        {
            var student = _studentService.Get(id);
            if (student != null) return Request.CreateResponse(HttpStatusCode.OK, student);
            return Request.CreateErrorResponse(HttpStatusCode.NotFound, "Student not found for provided id.");
        }
        public HttpResponseMessage GetAll()
        {
            var students = _studentService.GetAll();
            if (students.Any()) return Request.CreateResponse(HttpStatusCode.OK, students);
            return Request.CreateErrorResponse(HttpStatusCode.NotFound, "No students found.");
        }
        public void Post([FromBody] Student student)
        {
            _studentService.Insert(student);
        }
        public void Delete(int id)
        {
            _studentService.Delete(id);
        }
        public void Put([FromBody] Student student)
        {
            _studentService.Update(student);
        }
    }
}
We created five methods or we can say five APIs for handling CRUD operation. In the constructor we created object of the StudentService and in controllers’ method we will call service methods for handling client request.
The following command can be used to log into the MongoDB database. Make sure that the user with credentials such as username and password exist in the database mentioned in place of dbname.
Once logged in as a user with the appropriate role as userAdmin or userAdminAnyDatabase, the user can see all the databases using a command such as:
show dbs
Select Database to Work With
To start working with a particular database, the following command can be executed:
use databaseName
Authenticate and Log Out From Database
When switching to a different database using the use dbName command, the user is required to authenticate using a valid database user for that database. The following command can be used for authentication: Learn more from MongoDB Training
The following commands can be used to check existing collections, users, etc.
//
// List down collections of the current database
//
show collections;
db.getCollectionNames();
//
// List down all the users of current database
//
show users;
db.getUsers();
//
// List down all the roles
//
show roles
Create a Collection
The following command can be used to create a collection.
Once a collection is created, the next step is to insert one or more documents. Following is a sample command for inserting a document in a collection.’
The save command can be used to either update an existing document or insert a new one depending on the document parameter passed to it. If the _id passed matches an existing document, the document is updated. Otherwise, a new document is created. Internally, thesave method uses either the insert or the update command.
Matching document will be updated; In case, no document matching the ID is found, a new document is created
//
db.<collectionName>.save({"_id": new ObjectId("jhgsdjhgdsf"), field1: "value", field2: "value"});
Display Collection Records
The following commands can be used to retrieve collection records:
// Retrieve all records
//
db.<collectionName>.find();
//
// Retrieve limited number of records; Following command will print 10 results;
//
db.<collectionName>.find().limit(10);
//
// Retrieve records by id
//
db.<collectionName>.find({"_id": ObjectId("someid")});
//
// Retrieve values of specific collection attributes by passing an object having
// attribute names assigned to 1 or 0 based on whether that attribute value needs
// to be included in the output or not, respectively.
//
db.<collectionName>.find({"_id": ObjectId("someid")}, {field1: 1, field2: 1});
db.<collectionName>.find({"_id": ObjectId("someid")}, {field1: 0}); // Exclude field1
//
// Collection count
//
db.<collectionName>.count();
Administrative Commands
Following are some of the administrative commands that can be helpful in finding collection details such as storage size, total size, and overall statistics.
// Get the collection statistics
//
db.<collectionName>.stats()
db.printCollectionStats()
//
// Latency statistics for read, writes operations including average time taken for reads, writes
// and related umber of operations performed
//
db.<collectionName>.latencyStats()
//
// Get collection size for data and indexes
//
db.<collectionName>.dataSize() // Size of the collection
db.<collectionName>.storageSize() // Total size of document stored in the collection
db.<collectionName>.totalSize() // Total size in bytes for both collection data and indexes
db.<collectionName>.totalIndexSize() // Total size of all indexes in the collection
Couchbase and MongoDB are the two popular names in the list of NoSQL databases for any developer or business. Each has its own distinct features which make them loved among the developer’s community.
Couchbase Server is an open-source, document-oriented NoSQL database (DB). It is widely chosen for use in developing and deploying web, mobile and IoT applications in the industry. Its customer base includes pioneers in the industry like Cisco, AOL and so on.
MongoDB is again the next generation DB used to develop top-notch applications for large enterprises including web, mobile and IoT. The industry leaders like Adobe, Bosch etc use MongoDB for their applications.
So, if they are as good as the customer base suggests then what essentially differentiates both the DB’s? Here is a consolidated list of some essential features to solve the dilemma. For more info MongoDB Training
Installation & configuration
Couchbase has an integrated admin console and configures everything in a single place. Whereas, Mongo DB follows the master-slave principle and has many moving parts requiring manual configuration.
Structure & format
In Couchbase, the data is written in multiple data files in an append-only manner. These data files are further organized as B-trees. To prevent data from exhausting the disk space, Couchbase periodically cleans up stale data from its storage. On the other hand, Mongo DB stores data into collections of Binary-encoded JavaScript Object Notation or BJSON documents.
Memory
Couchbase uses one of the high-performance caches in the industry, the Memcached protocol and eliminates the need for any external cache. MongoDB requires the use of third-party caches to handle increased users and scalability.
Maintenance
In Couchbase, all the maintenance tasks can be performed using tools like Web UI, Command-line Interface (CLI) or REST API. While for Mongo DB, it can support only CLI tools for maintenance. And sometimes, third-party UI tools can also be used for this purpose.
Supported programming languages
Compared to Couchbase, MongoDB supports more programming languages.
Are you confused regarding your database choice? We can solve this dilemma too. Our qualified professionals have already helped over a thousand of enterprises in their digital transformation journey. Contact us today and get your apps running in the nick of time!
Query Language:
MongoDB uses its own query language that is created with documents in mind. It’s really simple to use:
db – denotes the currently selected database. To select a database use command: use name_of_the_db;
users – name of the collection in the selected database
find – method on a collection that selects the documents to be returned (it actually returns cursor with the selected documents, but let’s keep it simple)
Two documents are passed as arguments to _find_ method:
{ first_name : “Alice”, birth_year : { $gt : 1986 }} – the first one specifies what kind of documents we are searching for. In this case we are searching for users with first name ‘Alice’, born after 1986. More details on MongoDB Online Course
The second argument is a projection:
{ username : 1, first_name : 1, last_name : 1 } – it basically says return only username, first_name and last_name attributes for the selected documents (and _id which is returned by default).
So, MongoDB uses document structure to specify a query.
Couchbase introduced a N1QL – SQL-like query language, in version 4.0. The same query from above would look like this in N1QL:
Indexes
MongoDB uses a B-Tree data structure for its indexes, which is a quite old and battle-proven way of maintaining database indexes. That is what relational databases use. When combined with correctly modelled data in MongoDB, it provides quite a nice performance.
Unfortunately, the whole point of adding the Index part in this blog post is only because of Couchbase. Something is rotten in the state of Couchbase indexes.
Unlike MongoDB, Couchbase’s indexes are implemented using skip lists. Skip lists are usually used in in-memory databases. And Couchbase, being memory-first, happens to use skip lists for indexes.
It’s a rather young data structure, at least when compared to B-trees (which are 20 years older). So there are probably still some flaws and serious performance trade-offs in different implementations. Learn more from MongoDB Course
Why am I mentioning this at all? Because I lost weeks figuring out how to do some basic queries that will utilize the order of the elements in an index.
For example, it was an epic quest trying to get 50 newest documents, because the query involved ORDER BY timestamp, and it turned out that the ORDER BY clause does not work quite well with indexes in 4.1.1 CE.
Even when a query uses an index for fetching data, it is an order of magnitude slower than MongoDB. But to be clear, Couchbase claims that it is, indeed, slower on a single node environment in comparison with MongoDB, but that it outperforms MongoDB in cluster deployment.
Anyway, asking for help on Couchbase forums for very simple things because of poor documentation/implementation is not quite… well… scalable solution.
Documentation and community:
Having well-documented tools and large community are very important criteria when choosing a technology stack.
MongoDB’s documentation is one of the best I’ve ever seen. It is quite thorough, with lots of examples. They also have high quality free online courses which provide a solid foundation of knowledge and confidence when working with MongoDB.
On December 26th, 2016, there were 74,558 questions on StackOverflow tagged with mongodb.
At the same time there were only 2,155 questions tagged with couchbase. Combined with very poor documentation, choosing Couchbase for building anything with a deadline is a nice way of ruining your mental health.
But take my opinion with a grain of salt. I love simple systems and I prefer having a piece of toast and watching evening news instead of discovering workarounds and how undocumented features work. But if you like a bumpy ride, go for it!
Tooling:
MongoDB has been production ready for a long time (shut up, haters!), and 3rd party tools, as well as built-in ones, are decently built and documented.
Robomongo is an excellent admin UI for Mongo. There are several embedded MongoDB implementations, meaning that they can be started and shut down in integration tests as part of the build process. Get more details about MongoDB Certification
There is no Couchbase version that can be run as part of a build process yet. Also, internal tooling (like export and import tools) is not as powerful as Mongo’s.
For example cbdocloader tool which is used to import JSON into database cannot import JSON array (unlike mongoimport). I am not even sure if you can export data as JSON in 4.1.1.
Couchbase’s cbq tool (in CE version) cannot run query and direct the output to the file. Like mongo shell can (with –eval parameter).
All in all, the tooling in Couchbase gives a sense of unfinished products.
However, the strongest selling point of Couchbase are the following tools:
Couchbase Lite – mobile version of Couchbase
Sync Gateway – used for synchronization of Couchbase Lite with Couchbase Server
Together with Couchbase Server, these make a very powerful combo. You get out of the box synchronization across devices and server database. That sounds very promising.
Pricing Model:
MongoDB’s business model is: give the database for free and charge for additional tooling and support. This seems to have become a standard revenue model with companies built around open source tools.
Couchbase works differently. They provide older versions for free, currently 4.1.1 Community Edition (CE), and charge for the newest version, 4.5.1 Enterprise Edition (EE), and support is paid of course.
EE version can also be used in any non-production environment. The problem is that the CE version is currently quite buggy and hardly usable for some cases (like fetching 50 newest documents?!), so it seems like Couchbase wants you to pay for basic features that any other database can provide for free.
And, yes, the documentation sucks, so you better pay for support. Maybe it’s just my millennial entitlement, but I don’t like the idea of paying for support for trivial use cases. I want to have a chance to learn stuff and use the tool for solving business problems on my own.
MongoDB is a popular, open source, scale-out NoSQL database that provides high throughput for your data-driven applications. Unlike relational databases such as SQL Server, Oracle, and MySQL, which store data in tables according to a rigid schema, MongoDB stores data in documents with flexible schema.
There are many such non-relational databases around including CouchDB, RavenDB, and Couchbase. However, I like MongoDB primarily due to its scalability, speed, and dynamic querying capabilities.
MongoDB uses the BSON format under the hood to represent the JSON documents at the heart of the data store. BSON or “Binary JSON” is a lightweight and efficient binary-encoded data serialization format that supports fast data traversal and searches.
BSON also allows MongoDB to support data types—namely int, long, date, floating point, and decimal128—not represented in JSON.
In MongoDB documents are part of collections, in much the same way as a row is part of a table in a relational database. A document is essentially a collection of field and value pairs, which can also be nested. Learn more from MongoDB Certification
Note that a value in MongoDB can be a document, an array of documents, an array of BSON, or just a BSON type. Let’s look at how we can work with MongoDB using C#.
Install MongoDB and create a new project
Start by downloading the MongoDB binaries. Unzip the binaries to a folder of your choice in your system and create a separate folder (in my case C:\data\db) for the data. Then, to start MongoDB, navigate to the folder where MongoDB is installed and execute the mongod command in the command prompt window. That should start MongoDB at port 27017 by default.
Create a new console application project in Visual Studio and install the MongoDB.Driver package via the NuGet Package Manager Console with the following command.
PM> Install-Package MongoDB.Driver
This will install the following three NuGet packages at one go.
MongoDB.Bson
MongoDB.Driver.Core
MongoDB.Driver
Connect to your MongoDB instance
To connect to a MongoDB instance at its default port 27017, you can use the default constructor of the MongoClient class as shown below.
var client = new MongoClient();
Now consider the following class. We will use this class to store data in MongoDB.
public class Author
    {
        public int Id { get; set; }
        public string FirstName { get; set; }
        public string LastName { get; set; }
    }
Create a database and collection
The following code listing shows how you can create a database and a collection inside it and then insert an object inside the collection.
static void Main(string[] args)
    {
        var connectionString ="mongodb://localhost:27017";
        var client = new MongoClient(connectionString);
        IMongoDatabase db = client.GetDatabase(“IDG”);
        Author author = new Author
        {
            Id = 1,
            FirstName ="Joydip",
            LastName ="Kanjilal"
        };
        var collection = db.GetCollection<Author>(“authors”);
        collection.InsertOne(author);
        Console.Read();
    }
Note that the following namespaces should be included in your program.
using MongoDB.Bson;
using MongoDB.Driver;
Now refer to the Main method in the code listing above. Note that the following statement creates new a database named ”IDG” if none exists by that name.
IMongoDatabase db = client.GetDatabase(“IDG”);
Similarly, the following statement creates a new collection of ”Author” objects if none exists. In either case, the GetCollection method returns a collection instance.
var collection = db.GetCollection<Author>(“authors”);
Add documents to the collection
Next, we create an instance of the Author class and assign values to its FirstName and LastName properties. Learn more skills from MongoDB Online Course
Use the statement below to insert the instance of the Author class into the collection.
collection.InsertOne(author);
Note that you can insert multiple documents all at the same time using the InsertMany or InsertManyAsync method. The following code listing illustrates how the InsertMany method can be used.
using System;
using System.Collections.Generic;
using MongoDB.Bson;
using MongoDB.Driver;

static void Main(string[] args)
    {
        var connectionString ="mongodb://localhost:27017";
        var client = new MongoClient(connectionString);
        IMongoDatabase db = client.GetDatabase(“IDG”);
        var collection = db.GetCollection<BsonDocument>(“IDGAuthors”);
        var author1 = new BsonDocument
        {
            {”id”, 1},
            {”firstname”, “Joydip”},
            {”lastname”, “Kanjilal”}
        };
        var author2 = new BsonDocument
        {
            {”id”, 2},
            {”firstname”, “Steve”},
            {”lastname”, “Smith”}
        };
        var author3 = new BsonDocument
        {
            {”id”, 3},
            {”firstname”, “Gary”},
            {”lastname”, “Stevens”}
        };
        var authors = new List<BsonDocument>();
        authors.Add(author1);
        authors.Add(author2);
        authors.Add(author3);
        collection.InsertMany(authors);
        Console.Read();
    }
The BsonDocument class in the MongoDB.Bson package is used to represent a BSON document. The following code snippet shows how you can display the names of the databases available in the instance of MongoDB running in your system.
var connectionString ="mongodb://localhost:27017";
var client = new MongoClient(connectionString);
    using (var cursor = client.ListDatabases())
    {
        var databaseDocuments = cursor.ToList();
        foreach (var db in databaseDocuments)
        {
            Console.WriteLine(db[“name”].ToString());
        }
    }
When you execute the above code snippet, you will see the name of the database (i.e., “IDG”) listed in the console window. You can also use the asynchronous method, ListDatabasesAsync, to list the database names, as shown in the code snippet given below.
private static async Task DisplayDatabaseNames()
    {
        var connectionString ="mongodb://localhost:27017";
        var client = new MongoClient(connectionString);
        try
        {
            using (var cursor = await client.ListDatabasesAsync())
            {
                await cursor.ForEachAsync(document => Console.WriteLine(document.ToString()));
            }
        }
        catch
        {
            //Write your own code here to handle exceptions
        }
    }
MongoDB’s document data model makes it easy for developers and data scientists to store and combine data of any structure within the database, without giving up sophisticated validation rules to govern data quality.
The schema can be dynamically modified without application or database downtime that results from costly schema modifications or redesign incurred by relational database systems.
This data model flexibility is especially valuable to deep learning, which involves constant experimentation to uncover new insights and predictions:
Input datasets can comprise rapidly changing structured and unstructured data ingested from clickstreams, log files, social media and IoT sensor streams, CSV, text, images, video, and more. Many of these datasets do not map well into the rigid row and column formats of relational databases.
The training process often involves adding new hidden layers, feature labels, hyperparameters, and input data, requiring frequent modifications to the underlying data model. For more info MongoDB Training
A database supporting a wide variety of input datasets, with the ability to seamlessly modify parameters for model training, is therefore essential.
Rich Programming and Query Model
MongoDB offers both native drivers and certified connectors for developers and data scientists building deep learning models with data from MongoDB. The PyMongo driver is the recommended way to work with MongoDB from Python, implementing an idiomatic API that makes development natural for Python programmers. The community developed MongoDB Client for R is also available for R programmers.
The MongoDB query language and rich secondary indexes enable developers to build applications that can query and analyze the data in multiple ways.
Data can be accessed by single keys, ranges, text search, graph, and geospatial queries through to complex aggregations and MapReduce jobs, returning responses in milliseconds. Learn more skills from MongoDB Online Course
To parallelize data processing across a distributed database cluster, MongoDB provides the aggregation pipeline and MapReduce. The MongoDB aggregation pipeline is modeled on the concept of data processing pipelines.
Documents enter a multi-stage pipeline that transforms the documents into an aggregated result using native operations executed within MongoDB.
The most basic pipeline stages provide filters that operate like queries, and document transformations that modify the form of the output document.
Other pipeline operations provide tools for grouping and sorting documents by specific fields as well as tools for aggregating the contents of arrays, including arrays of documents.
In addition, pipeline stages can use operators for tasks such as calculating the average or standard deviations across collections of documents, and manipulating strings. MongoDB also provides native MapReduce operations within the database, using custom JavaScript functions to perform the map and reduce stages.
In addition to its native query framework, MongoDB also offers a high performance connector for Apache Spark. The connector exposes all of Spark’s libraries, including Python, R, Scala and Java.
MongoDB data is materialized as DataFrames and Datasets for analysis with machine learning, graph, streaming, and SQL APIs.
The MongoDB Connector for Apache Spark can take advantage of MongoDB’s aggregation pipeline and secondary indexes to extract, filter, and process only the range of data it needs – for example, analyzing all customers located in a specific geography.
This is very different from simple NoSQL datastores that do not support either secondary indexes or in-database aggregations. In these cases, Spark would need to extract all data based on a simple primary key, even if only a subset of that data is required for the Spark process.
This means more processing overhead, more hardware, and longer time-to-insight for data scientists and engineers. Get additional knowledge from MongoDB Certification
To maximize performance across large, distributed data sets, the MongoDB Connector for Apache Spark can co-locate Resilient Distributed Datasets (RDDs) with the source MongoDB node, thereby minimizing data movement across the cluster and reducing latency.
Performance, Scalability & Redundancy
Model training time can be reduced by building the deep learning platform on top of a performant and scalable database layer. MongoDB offers a number of innovations to maximize throughput and minimize latency of deep learning workloads:
WiredTiger is the default storage engine for MongoDB, developed by the architects of Berkeley DB, the most widely deployed embedded data management software in the world. WiredTiger scales on modern, multi-core architectures. Using a variety of programming techniques such as hazard pointers, lock-free algorithms, fast latching and message passing, WiredTiger maximizes computational work per CPU core and clock cycle. To minimize on-disk overhead and I/O, WiredTiger uses compact file formats and storage compression.
For the most latency-sensitive deep learning applications, MongoDB can be configured with the In-Memory storage engine. Based on WiredTiger, this storage engine gives users the benefits of in-memory computing, without trading away the rich query flexibility, real-time analytics, and scalable capacity offered by conventional disk-based databases.
To parallelize model training and scale input datasets beyond a single node, MongoDB uses a technique called sharding, which distributes processing and data across clusters of commodity hardware. MongoDB sharding is fully elastic, automatically rebalancing data across the cluster as the input dataset grows, or as nodes are added and removed.
Within a MongoDB cluster, data from each shard is automatically distributed to multiple replicas hosted on separate nodes. MongoDB replica sets provide redundancy to recover training data in the event of a failure, reducing the overhead of checkpointing.
Tunable Consistency
MongoDB is strongly consistent by default, enabling deep learning applications to immediately read what has been written to the database, thus avoiding the developer complexity imposed by eventually consistent systems.
Strong consistency will provide the most accurate results for machine learning algorithms; however in some scenarios, such as SGD, it is acceptable to trade consistency against specific performance goals by distributing queries across a cluster of MongoDB secondary replica set members.
MongoDB AI Deployments
Due to the properties discussed above, MongoDB is serving as the database for many AI and deep learning platforms. A selection of users across different applications and industries follows:
IBM Watson: Analytics & Visualization
Watson Analytics is IBM’s cloud-hosted service providing smart data discovery to guide data exploration, automate predictive analytics and visualize outputs. Watson Analytics is used across banking, insurance, retail, telecommunications, petroleum, and government applications.
MongoDB is used alongside DB2 for managing data storage. MongoDB provides a metadata repository of all source data assets and analytics visualizations, stored in rich JSON document structures, with the scalability to support tens of thousands of concurrent users accessing the service.
x.ai: Personal Assistant
x.ai is an AI-powered personal assistant that schedules meetings for its user. Users connect their calendars to x.ai, and then when it’s time to set a meeting via email, users instead delegate the scheduling task to ‘Amy Ingram’ by ccing amy@x.ai. Once she’s copied into the email thread, she finds a mutually agreeable time and place and sets up the meeting for you
MongoDB serves as the system of record for the entire x.ai platform, supporting all services including natural language processing, supervised learning, analytics and email communication. MongoDB’s flexible data model has been critical in enabling x.ai to rapidly adapt its training and input data sets, while supporting complex data structures.
Auto Trader: Predicting Value
The UK’s largest digital car marketplace makes extensive use of machine learning running against data stored in MongoDB. The car’s specifications and details, such as number of previous owners, condition, color, mileage, insurance history, upgrades, and more are stored in MongoDB.
This data is extracted by machine learning algorithms written by Auto Trader’s data science team to generate accurate predictions of value, which are then written back to the database.
MongoDB was selected due to its flexible data model and distributed design, allowing scalability across a cluster of more than 40 instances.
Mintigo: Predictive Sales & Marketing
Founded by former intelligence agency data scientists, Mintigo delivers a predictive marketing engine for companies such as Red Hat.
Through sophisticated machine learning algorithms operating against large data sets stored in MongoDB, Mintigo helps marketing and sales organizations better identify leads most likely to convert to customers.
Through its engine, Mintigo users average a 4x improvement in overall marketing funnel efficiency. Mintigo runs on AWS, with machine learning algorithms written in Python.
MongoDB is used to store multi-TB data sets, and was selected for scalability of streaming data ingest and storage, and schema flexibility. MongoDB’s expressive query framework and secondary indexes feeds the algorithms with relevant data, without needing to scan every record in the database. For more MongoDB Course
Geo-Location Analysis for Retail
A US-based mobile app developer has built its Intelligence Engine on MongoDB, processing and storing tens of millions of rich geospatial data points on customers and their locations in real time.
The Intelligence Engine uses scalable machine learning and multi-dimensional analytic techniques to surface behavioral patterns that allows retailers to predict and target customers with location-based offers through their mobile devices.
MongoDB’s support for geospatial data structures with sophisticated indexing and querying provides the foundation for the machine learning algorithms. MongoDB’s scale-out design with sharding allows the company to scale from 10s to 100s of millions of customer data points.
Natural Language Processing (NLP)
A North American AI developer has built NLP software that is embedded by major consumer electronics brands into smart home and mobile devices.
All interactions between the device and user are stored in MongoDB, which are then fed back into the learning algorithms. MongoDB was selected for its schema flexibility that supports rapidly changing data structures.
Bringing Data Science to Talent Acquisition
Working with HR departments in the Fortune 500, this company tackles the resume pile and candidate sourcing problem with data science and workforce intelligence.
The company provides real-time analysis and prioritization of applicants by applying AI to thousands of information sources beyond the resume, including public and enterprise data.
With predictive analytics generated by its AI algorithms, recruiters can instantly identify the most qualified candidates among active and passive applicants, accelerating the hiring process and reducing costs per hire.
MongoDB was selected as the underlying database due to its data model flexibility and scale, coupled with extensive security controls to protect Personally Identifiable Information (PII).
This guide walks you through the process of using Spring Data MongoDB to build an application that stores data in and retrieves it from MongoDB, a document-based database.
What You Will build
You will store Customer POJOs (Plain Old Java Objects) in a MongoDB database by using Spring Data MongoDB.
What You Need
About 15 minutes
A favorite text editor or IDE
JDK 1.8 or later
Gradle 4+ or Maven 3.2+
You can also import the code straight into your IDE:
Spring Tool Suite (STS)
IntelliJ IDEA
How to complete this guide
Like most Spring Getting Started guides, you can start from scratch and complete each step or you can bypass basic setup steps that are already familiar to you. Either way, you end up with working code. Learn more from MongoDB Training
To start from scratch, move on to Starting with Spring Initializr.
To skip the basics, do the following:
Download and unzip the source repository for this guide, or clone it using Git: git clone https://github.com/spring-guides/gs-accessing-data-mongodb.git
cd into gs-accessing-data-mongodb/initial
Jump ahead to Install and Launch MongoDB.
When you finish, you can check your results against the code in gs-accessing-data-mongodb/complete.
Starting with Spring Initializr
For all Spring applications, you should start with the Spring Initializr. The Initializr offers a fast way to pull in all the dependencies you need for an application and does a lot of the set up for you. This example needs only the Spring Data MongoDB dependency. The following image shows the Initializr set up for this sample project:
The following listing shows the pom.xml file created when you choose Maven:
The following listing shows the build.gradle file created when you choose Gradle:
plugins { id 'org.springframework.boot' version '2.2.0.RELEASE' id 'io.spring.dependency-management' version '1.0.8.RELEASE' id 'java' }
group = 'com.example' version = '0.0.1-SNAPSHOT' sourceCompatibility = '1.8' repositories { mavenCentral() }
dependencies { implementation 'org.springframework.boot:spring-boot-starter-data-mongodb' testImplementation('org.springframework.boot:spring-boot-starter-test')
{ exclude group: 'org.junit.vintage', module: 'junit-vintage-engine' } }
test { useJUnitPlatform() }
Install and Launch MongoDB
With your project set up, you can install and launch the MongoDB database.
If you use a Mac with Homebrew, you can run the following command:
$ brew install mongodb
With MacPorts, you can run the following command: For more info MongoDB Certification
$ port install mongodb
For other systems with package management, such as Redhat, Ubuntu, Debian, CentOS, and Windows.
After you install MongoDB, you can launch it in a console window by running the following command (which also starts up a server process):
$ mongod
You should see output similar to the following:
all output going to: /usr/local/var/log/mongodb/mongo.log
Define a Simple Entity
MongoDB is a NoSQL document store. In this example, you store Customer objects. The following listing shows the Customer class (in src/main/java/com/example/accessingdatamongodb/Customer.java):
package com.example.accessingdatamongodb;
import org.springframework.data.annotation.Id;
public class Customer { @Id public String id;
public String firstName; public String lastName;
public Customer() {}
public Customer(String firstName, String lastName)
{ this.firstName = firstName; this.lastName = lastName; }
@Override public String toString()
{ return String.format( "Customer[id=%s, firstName='%s', lastName='%s']", id, firstName, lastName); } }
Here you have a Customer class with three attributes: id, firstName, and lastName. The id is mostly for internal use by MongoDB. You also have a single constructor to populate the entities when creating a new instance.
id fits the standard name for a MongoDB ID, so it does not require any special annotation to tag it for Spring Data MongoDB.
The other two properties, firstName and lastName, are left unannotated. It is assumed that they are mapped to fields that share the same name as the properties themselves. Get More programming skills from MongoDB Certification
The convenient toString() method prints out the details about a customer.
Create Simple Queries
Spring Data MongoDB focuses on storing data in MongoDB. It also inherits functionality from the Spring Data Commons project, such as the ability to derive queries. Essentially, you need not learn the query language of MongoDB. You can write a handful of methods and the queries are written for you.
To see how this works, create a repository interface that queries Customer documents, as the following listing (in src/main/java/com/example/accessingdatamongodb/CustomerRepository.java) shows:
package com.example.accessingdatamongodb;
import java.util.List;
import org.springframework.data.mongodb.repository.MongoRepository;
public interface CustomerRepository extends MongoRepository<Customer, String>{
public Customer findByFirstName(String firstName);
public List<Customer> findByLastName(String lastName); }
CustomerRepository extends the MongoRepository interface and plugs in the type of values and ID that it works with: Customer and String, respectively. This interface comes with many operations, including standard CRUD operations (create, read, update, and delete).
You can define other queries by declaring their method signatures. In this case, add findByFirstName, which essentially seeks documents of type Customer and finds the documents that match on firstName.
You also have findByLastName, which finds a list of people by last name.
In a typical Java application, you write a class that implements CustomerRepository and craft the queries yourself. What makes Spring Data MongoDB so useful is the fact that you need not create this implementation. Spring Data MongoDB creates it on the fly when you run the application.
Now you can wire up this application and see what it looks like!
Create an Application Class
Spring Initializr creates a simple class for the application. The following listing shows the class that Initializr created for this example (in src/main/java/com/example/accessingdatamongodb/AccessingDataMongodbApplication.java):
package com.example.accessingdatamongodb;
import org.springframework.boot.SpringApplication;
import org.springframework.boot.autoconfigure.SpringBootApplication;
@SpringBootApplication public class AccessingDataMongodbApplication {
public static void main(String[] args) {
SpringApplication.run(AccessingDataMongodbApplication.class, args); } }
@SpringBootApplication is a convenience annotation that adds all of the following:
@Configuration: Tags the class as a source of bean definitions for the application context.
@EnableAutoConfiguration: Tells Spring Boot to start adding beans based on classpath settings, other beans, and various property settings. For example, if spring-webmvc is on the classpath, this annotation flags the application as a web application and activates key behaviors, such as setting up a DispatcherServlet.
@ComponentScan: Tells Spring to look for other components, configurations, and services in the com/example package, letting it find the controllers.
The main() method uses Spring Boot’s SpringApplication.run() method to launch an application.
Did you notice that there was not a single line of XML? There is no web.xml file, either. This web application is 100% pure Java and you did not have to deal with configuring any plumbing or infrastructure.
Spring Boot automatically handles those repositories as long as they are included in the same package (or a sub-package) of your @SpringBootApplication class. For more control over the registration process, you can use the @EnableMongoRepositories annotation.
Spring Data MongoDB uses the MongoTemplate to execute the queries behind your find* methods. You can use the template yourself for more complex queries, but this guide does not cover that.
Now you need to modify the simple class that the Initializr created for you. You need to set up some data and use it to generate output. The following listing shows the finished AccessingDataMongodbApplication class (in src/main/java/com/example/accessingdatamongodb/AccessingDataMongodbApplication.java):
package com.example.accessingdatamongodb;
import org.springframework.beans.factory.annotation.Autowired;
import org.springframework.boot.CommandLineRunner;
import org.springframework.boot.SpringApplication;
import org.springframework.boot.autoconfigure.SpringBootApplication;
@SpringBootApplication public class AccessingDataMongodbApplication implements CommandLineRunner { @Autowired private CustomerRepository repository;
public static void main(String[] args) {
SpringApplication.run(AccessingDataMongodbApplication.class, args); }
@Override public void run(String... args)
throws Exception { repository.deleteAll();
// save a couple of customers repository.save(new Customer("Alice", "Smith"));
repository.save(new Customer("Bob", "Smith"));
// fetch all customers
System.out.println("Customers found with findAll():");
System.out.println("-------------------------------");
for (Customer customer : repository.findAll()) {
System.out.println(customer); }
System.out.println();
// fetch an individual customer
System.out.println("Customer found with findByFirstName('Alice'):");
System.out.println("--------------------------------"); System.out.println(repository.findByFirstName("Alice"));
System.out.println("Customers found with findByLastName('Smith'):");
System.out.println("--------------------------------");
for (Customer customer : repository.findByLastName("Smith")) {
System.out.println(customer); } } }
AccessingDataMongodbApplication includes a main() method that autowires an instance of CustomerRepository. Spring Data MongoDB dynamically creates a proxy and injects it there. We use the CustomerRepository through a few tests. First, it saves a handful of Customer objects, demonstrating the save() method and setting up some data to use. Next, it calls findAll() to fetch all Customer objects from the database. Then it calls findByFirstName() to fetch a single Customer by her first name. Finally, it calls findByLastName() to find all customers whose last name is Smith.
Build an executable JAR
You can run the application from the command line with Gradle or Maven. You can also build a single executable JAR file that contains all the necessary dependencies, classes, and resources and run that. Building an executable jar so makes it easy to ship, version, and deploy the service as an application throughout the development lifecycle, across different environments, and so forth.
If you use Gradle, you can run the application by using ./gradlew bootRun. Alternatively, you can build the JAR file by using ./gradlew build and then run the JAR file, as follows:
If you use Maven, you can run the application by using ./mvnw spring-boot:run. Alternatively, you can build the JAR file with ./mvnw clean package and then run the JAR file, as follows:


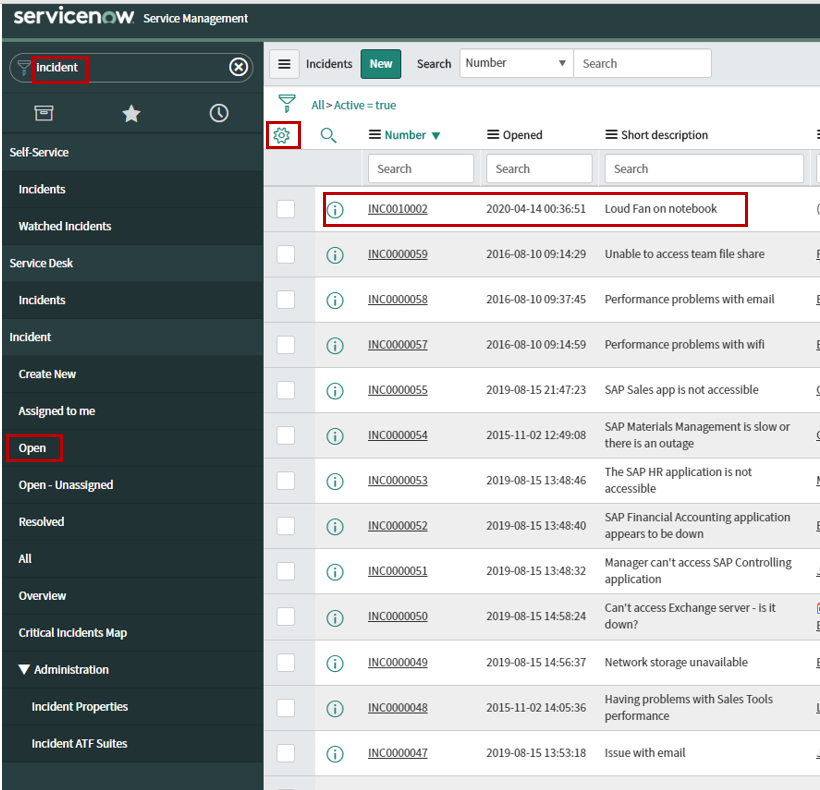
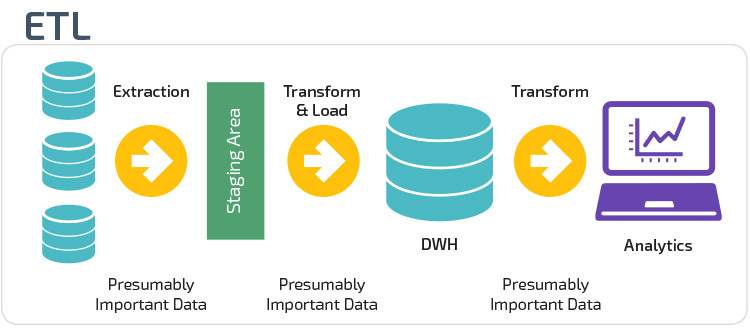
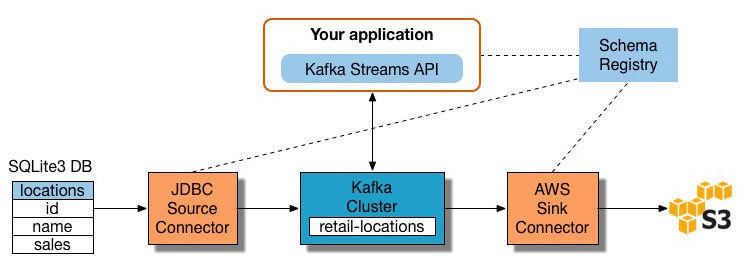
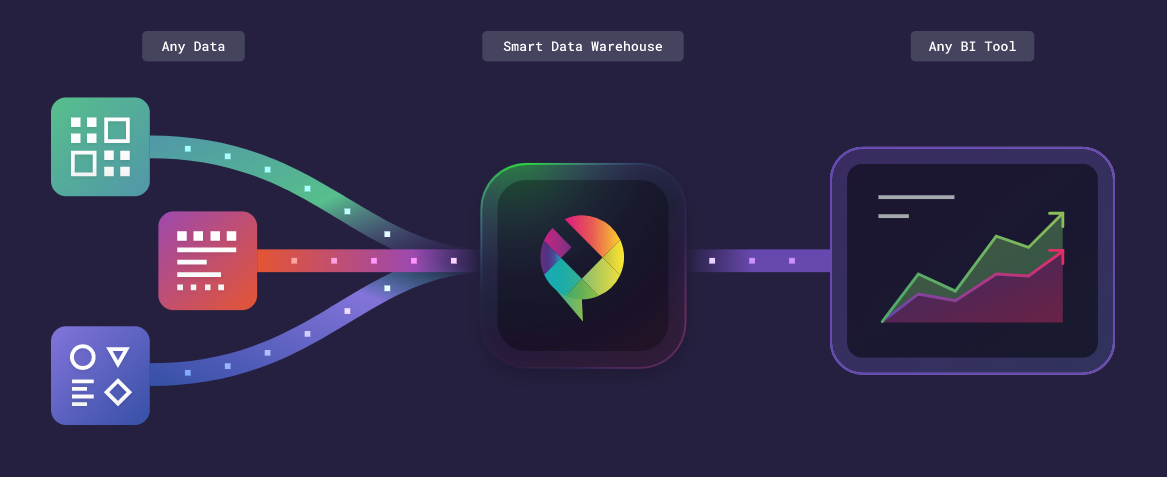


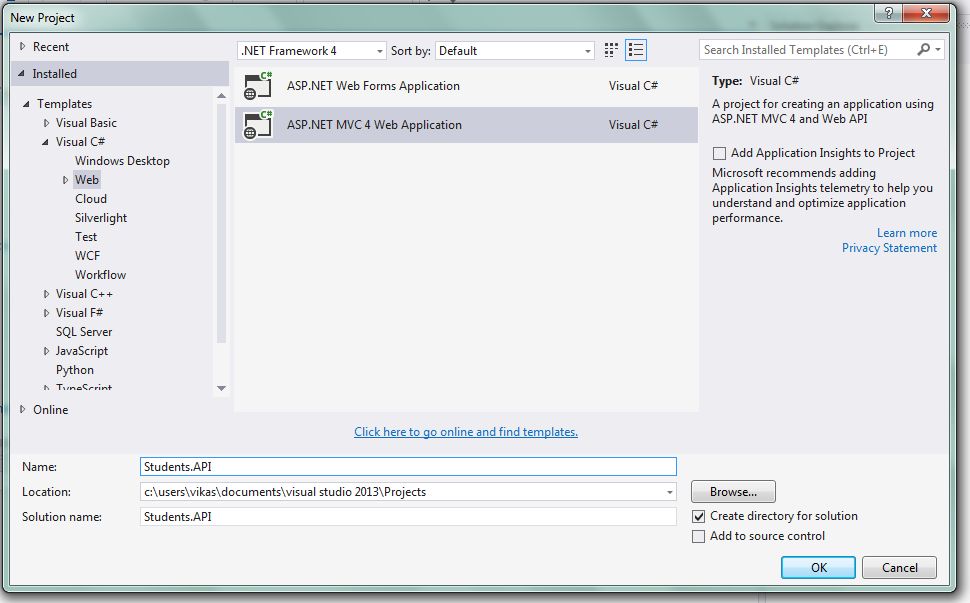
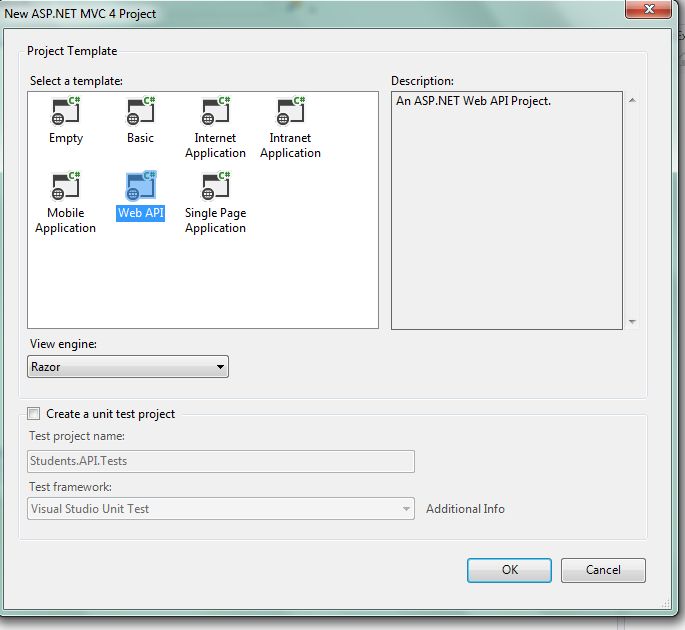
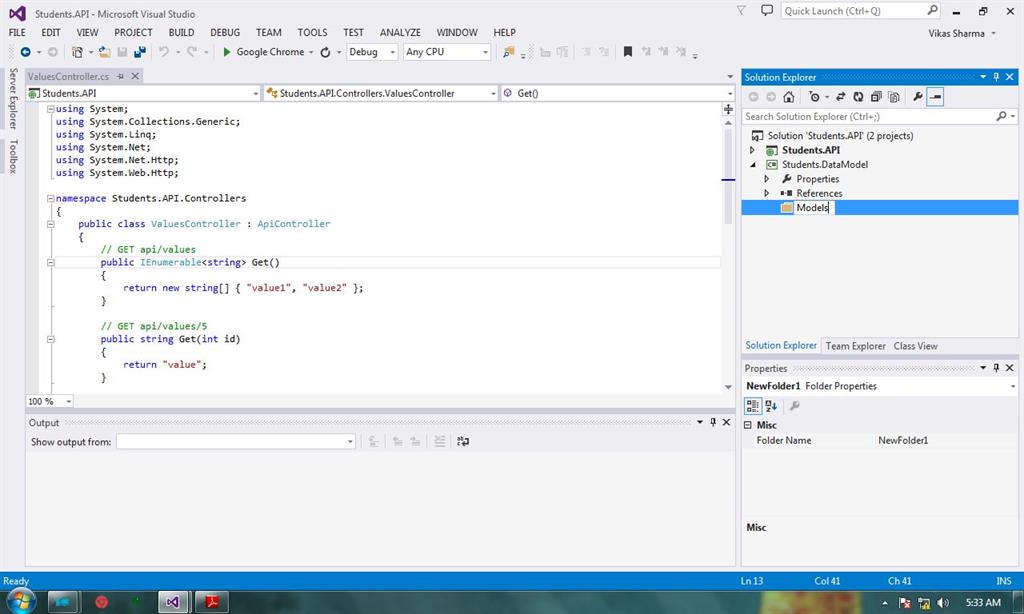

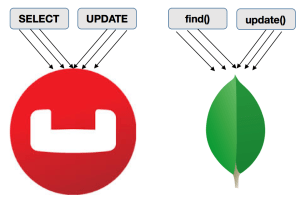


